[Find 계열]
씬 안에 존재하는 오브젝트, 컴포넌트를 찾는다.
[주의사항]
씬 전체를 탐색한다(비용이 크다)
Update 반복 호출 시 문제 발생(Awake나 Start에서 한 번만 찾아서 사용해야 한다)
Find 계열을 써야하는 상황은 분명 있으나, 비용이 크기 때문에 성능 저하의 주 원인이 된다.
//대체 1: 인스펙터 직접 할당
[SerializeField]
//대체 2: 코드 중심 접근 필요 시, 컴포넌트 직접 탐색
[GetComponentInChildren]
: 현재 오브젝트의 자식 방향으로 컴포넌트를 찾는다.
ex) 캐릭터 모델 속 애니메이션 찾기, 무기 속 총구 위치 찾기, 전체 UI에서 특정 자식 버튼 찾기 등
[GetComponentInParent]
: 현재 오브젝트의 부모 방향으로 컴포넌트를 찾는다.
ex) 히트박스 내에서 캐릭터 본체 찾기, UI 버튼 위의 UI 컨트롤러 찾기, 무기를 들고있는 Player 찾기 등
//대체3: 이름 대신 태그/타입 Find를 사용한다.
[종류]
1. GameObject.Find("이름")
가장 단순한 형태, 씬 전체를 검
2. GameObject.FindWithTag("태그")
지정한 태그를 가진 오브젝트 검색. (단수형)같은 태그가 여럿일 시 하나만 반환
설정 되지 않은 태그 찾을 시 오류 발생
3. GameObjects.FindGameObjectWithTag("태그");
2번의 복수형 (외엔 동일)
4. GameObject.FindAnyObjectByType<GameManager>();
씬에서 해당 타입 검색
5. FindObjectsByType
배열 탐색. 매우 무겁다.
[코루틴 Coroutine]
코드 실행 일시정지 후 나중에 실행할 수 있게 한다.
제어권을 잠깐 유니티에게 넘긴 후, 실행 조건 만족 시 중단된 부분부터 다시 재생한다.
일반적인 메서드는 호출 시 해당 프레임 안에서 모든걸 마치고 값을 반환한다. 때문에 무거운 연산을 한 프레임에 처리를 시도할 시 렉이 발생한다(Update의 반복호출)
코루틴은 실행을 일시 중단 후, 다음 프레임에 이어서 실행한다(프레임 분산, 시간 기반 대기, 비동기적 흐름)
이제부턴 상황에 따라 Update와 코루틴을 번갈아가며 사용하게 될 것이다.
코루틴을 잘 응용할 시, Update만 사용하는 것 보다 최적화/가독성 을 챙길 수 있다.
ex) 몇 초 뒤 실행, 일정 시간마다 반복 실행
(공격 딜레이, 총알 발사 간격 조절, 몬스터 스폰, UI 페이드인/아웃, 재장전, 스킬쿨, 웨이브 시스템 등)
[주의사항]
Update 반복 호출 시 문제 발생(Start에서 사용)
좀 더 안전하게 사용한다면 OnDisable()에서 StopCoroutine 을 사용한다.
//IEnumerator 타입 메서드를 사용하여 정의되며, StartCoroutine 메서드를 통해 시작된다.
//IEumeator: 컬렉션 요소를 하나씩 순차적으로 접근하는 방법 정의. 콜렉션 네임스페이스 사용.
using System.Collections; //네임스페이스
void Start()
{
StartCoroutine(코루틴 이름()); //코루틴 시작
}
IEumerator 코루틴 이름() //코루틴 내용
{
yield return ~대기조건~;
}
[자주 사용되는 yield return 목록]
yield return null; : 다음 프레임 까지 대기
yield return new WaitForSeconds(float time); : 지정 시간(초)대기
yield return new WaitForSecondsRealtime(float time); : (현실시간 기준)지정 시간 대기
yield return new WaitForFixedUpdate(); : 다음 물리 프레임까지 대기(물리 연산 연동시 사용)
yield return StartCoroutine(다른 코루틴 이름) : 다른 코루틴 종료까지 대기
yield break; : 실행 중인 코루틴 즉시 종료
[예제 코드]
해당 코드는 Update메서드와 Coroutine은 같은 내용을 실행한다.
using System.Collections; //IEnumerator 사용
using UnityEngine;

public class CoBasic : MonoBehaviour
{
	//Update메서드와 Coroutine메서드 선택 사용
    public enum TestMode{UpdateMethod, CoroutineMethod }
    [Header("테스트 선택")]
    public TestMode currentMode = TestMode.CoroutineMethod;

	//Update용 변수
    private int updateCount = 0; //실행 카운트
    private float updateTimer = 0.0f; //타이머
    private bool updateWaiting = true; //대기

	//Start에서 코루틴 호출
    private void Start()
    {
        if(currentMode == TestMode.CoroutineMethod) //Coroutine메서드 선택 시 실행될 내용
        {
        	//[1]
            StartCoroutine(PrintNumberCo());
            //[2]
            StartCoroutine(PrintDelayCo());
            //[3]
            StartCoroutine(MainRoutineCo());
        }
    }

    //업데이트
    void Update()
    {
        if(currentMode == TestMode.UpdateMethod) //Update메서드 선택 시 실행될 내용
        {
            //[1] 매프레임 5번 실행
            if(updateCount<5)
            {
                Debug.Log($"{updateCount}");
                updateCount++;
            }

            //[2] 1초에 1번, 총 3번 실행
            if(updateCount<3)
            {
                updateTimer += Time.deltaTime; //시간보정
                if(updateTimer>=1.0f) //1초 경과시 실행
                {
                    Debug.Log($"{updateCount}");
                    updateCount++;
                    updateTimer = 0.0f;
                }
            }
            //[3] 2초 대기 후 실행
            if(updateWaiting)
            {
                updateTimer += Time.deltaTime; //시간보정
                if (updateTimer >= 2.0f) //2초 경과시 실행
                {
                    Debug.Log("딜레이?");
                    updateWaiting = false;
                }
            }
        }
    }

    //코루틴
    //[1] 매프레임 5번 실행
    IEnumerator PrintNumberCo()
    {
        for (int i = 0; i < 5; i++)
        {
            Debug.Log($"{i}");
            yield return null; //다음 프레임까지 대기
        }
    }

    //[2] 1초에 1번, 총 3번 실행
    IEnumerator PrintDelayCo()
    {
        for(int i = 0; i<3; i++)
        {
            Debug.Log($"{i}");
            yield return new WaitForSeconds(1.0f); //1초 대기
        }
        /*
        //코루틴 캐싱: 미리 선언 후 재사용, 반복 생성 방지
        자주 반복되는 구문에서 최적화를 위해 사용하기도 한다
        while (true)
        {
            yield return new WaitForSeconds(0.1f);
        }
        */
    }

    //[3] 2초 대기(실행 후 중단, WaitPrintCo 종료 후, 실행)
    IEnumerator MainRoutineCo()
    {
        Debug.Log("코루틴 첫번째");
        yield return StartCoroutine(WaitPrintCo()); //다른 코루틴(WaitPrintCo)종료까지 대기
        Debug.Log("모든 루틴 완료");
    }
    IEnumerator WaitPrintCo()
    {
        yield return new WaitForSeconds(2.0f); //2초 대기 후 실행
        Debug.Log("딜레이 완료");
    }
}
해당 코드는 코루틴을 통해 Update 메서드 없이 오브젝트의 머테리얼 색상을 변경하는 코드이다.
using System.Collections; //IEnumerator 사용
using UnityEngine;

public class CoTest : MonoBehaviour
{
    private Renderer cubeRenderer; //렌더러 = cubeRenderer
    private Material cubeMaterial; //머테리얼 = cubeMaterial
    private WaitForSeconds wait; //코루틴의 WaitForSeconds
    void Start()
    {
        cubeRenderer = GetComponent<Renderer>(); //렌더러 가져오기
        cubeMaterial = cubeRenderer.material; //렌더러의 머테리얼 가져오기
        wait = new WaitForSeconds(1.0f); //wait = 1초 대기

        StartCoroutine(ChangeColorCo()); //코루틴 실행
    }

    IEnumerator ChangeColorCo()
    {
        while(true)
        {
        //머테리얼 값이 null일 시
            if (cubeMaterial == null) yield break; //코루틴 즉시 종료
	//null이 아닐 시, rgb(255,255,255)내에서 랜덤 변경
            cubeMaterial.color = new Color(Random.value, Random.value, Random.value);

            yield return wait; //new WaitForSeconds(1.0f)
        }
    }
}
[1] Update 사용 코드
//코루틴 없이 방방 뛰는걸 구현해보자
using UnityEngine;

public class CoTest2 : MonoBehaviour
{
    [SerializeField] private float bounceHeight = 2.0f;
    [SerializeField] private float bounceDuration = 1.0f;

    //Update용 변수값
    private Vector3 startPosition;
    private Vector3 targetPosition;
    private float elapsedTime = 0.0f; //경과시간
    private bool movingUp = true;

    void Start()
    {
        startPosition = transform.position; //오브젝트 시작위치
        targetPosition = startPosition + new Vector3(0.0f, bounceHeight, 0.0f); //시작위치 + y축 2.0
    }

    void Update()
    {
        elapsedTime += Time.deltaTime; //프레임 보정

        if(movingUp) //true일 시 상승
        {
            //y값을 부드럽게 이동(시작위치에서, 시작위치 + y축 2.0 까지, 경과시간/1초 값 만큼)
            transform.position = Vector3.Lerp(startPosition, targetPosition, elapsedTime / bounceDuration);
        }
        else //false일 시 하강
        {
            //y값을 부드럽게 이동(시작위치 + y축 2.0 에서, 시작위치까지, 경과시간/1초 값 만큼)
            transform.position = Vector3.Lerp(targetPosition, startPosition, elapsedTime / bounceDuration);
        }

        if (elapsedTime >= bounceDuration) //이동시간이 Duration(1초)을 넘으면 한 사이클 종료
        {
            elapsedTime = 0.0f; //경과 시간 초기화 후
            movingUp = !movingUp; //false 반환
        }
    }
}
[2] Coroutine 사용 코드
//코루틴으로 방방 뛰는걸 구현해보자
using System.Collections;
using UnityEngine;

public class CoTest2 : MonoBehaviour
{
    [SerializeField] private float bounceHeight = 2.0f;
    [SerializeField] private float bounceDuration = 1.0f;

    void Start()
    {
        StartCoroutine(BounceCubeCo()); //코루틴 실행
    }

    }
    IEnumerator BounceCubeCo()
    {
        Vector3 startPosition = transform.position; //시작위치
        Vector3 targetPosition = startPosition + Vector3.up * bounceHeight; //시작위치 + y축 2.0

        while(true)//반복문 (실행 순서: [1 - MoveObject] - [2 - MoveObject], 반복)
        {
            //[1]다른 코루틴 종료 시 실행(오브젝트의 transform 값을 start에서 target까지, float duration = 1)
            yield return StartCoroutine(MoveObject(transform, startPosition, targetPosition, bounceDuration));
            //[2]다른 코루틴 종료 시 실행(오브젝트의 transform 값을 target에서 start까지, float duration = 1)
            yield return StartCoroutine(MoveObject(transform, targetPosition, startPosition, bounceDuration));
        }
    }
    //오브젝트의 transform을, start에서, end까지, float duration만큼 이동하는 코루틴
    IEnumerator MoveObject(Transform transform, Vector3 start, Vector3 end, float duration)
    {
        float elapsedTime = 0.0f; //경과시간

        while(elapsedTime < duration) //경과시간이 duration보다 작을 때까지 실행
        {
            //부드럽게 이동(start에서, end까지, 경과시간 / 1만큼)
            transform.position = Vector3.Lerp(start, end, elapsedTime / duration);
            elapsedTime += Time.deltaTime; //프레임 보정
            yield return null; //다음 프레임까지 대기
        }
    }
}
[UI의 Image, Slider 사용법]
UI Canvas - Image 에서 이미지 생성
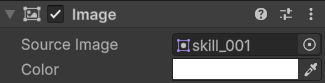
[Image]
Source Image : 이미지 에셋 드래그 시, 해당 이미지 출력.
Color : 드로잉툴의 곱하기 레이어 개념

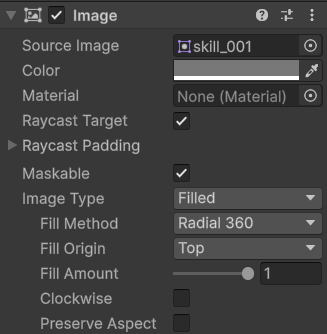
[Image Type]
화면에 이미지를 표현하고 크기 변화에 대응
Simple: (디폴트)원본 비율 그대로 그리거나, Rect Transform에 맞춰 전체를 늘린다
Sliced : 모서리는 원본비율 유지, 중앙 영역만 늘려 UI패널 테두리가 깨지지 않게 한다
Tiled: 이미지를 늘리지 않고, 크기에 맞춰 반복 배열(타일링)
Filled: 이미지 일부를 특정 방향, 비율만큼 채워지거나 비워지도록 표현(체력바, 스킬 쿨타임 등에 사용)
- Horizontal: 가로 선형 방식(Hp, Mp, Exp 바, 횡스크롤 로딩 바 등에 사용)
- Vertical: 세로 선형 방식(쿨타임 등에 사용)
- Radial 계열: 각도에 따른 원형 선형 방식
- Fill Origin: Filed가 시작되는 지점
- Fill Amount: 채워지거나 비워지는 값
- Clockwise/Preserve Aspect: 지점 방향 반전
[Slider]
슬라이더 내부의 자식
Background: 백그라운드(슬라이더 기본 색상)
Fill Area: 슬라이더 값이 채워진 상태
- Fill : 슬라이더 값, 색상
Handle Slide Area: 슬라이더의 퍼센트를 나타내는 점
[Add Component - Button]
컴포넌트에서 추가 가능한 인스펙터.
UI 상호작용 핵심 요소.
플레이어 클릭(마우스 입력 또는 터치)에 반응하여 특정 이벤트를 실행하고 시각적 상태를 변경하는 기능.
On Click() : 사용자가 버튼 클릭 시 특정 메서드나 동작을 실행하게 해주는 기능
+로 추가 후, 기능 실행 시 불러올 오브젝트를 드래그 한다. 추가된 스크립트에 따라 기능이 추가될 수 있다.
[코루틴을 활용한 스킬 UI 제작]
1. 이미지 UI 'Skill' 에 자식으로 이미지 'CoolDown' 을 추가

2. 자식의 설정을 변경해준다
- 부모와 동일한 이미지 에셋 사용
- Color를 회색으로 변경
- Image Type을 Filled로 변경, Vertical 또는 Radial 360 사용
- (Radial 360 사용 시) Origin은 Top, Clockwise를 off
3. 스킬 실행 중임을 표시하는 슬라이더바 추가
4. 자식 설정을 변경해준다
- 자식 오브젝트의 Handle Slide Area 삭제
- Background의 Color를 검은색으로 변경
- Fill Area의 자식 Fill의 width를 0, color 색상 변경
4. 코루틴 기반 코드 작성
using System.Collections;
using UnityEngine;
using UnityEngine.UI; //유니티 UI 네임스페이스

public class SkillController : MonoBehaviour
{
    [SerializeField] private float castingTime = 1.5f; //캐스팅(쿨타임 실행까지 걸리는 시간)
    [SerializeField] private float coolTime = 5.0f; //쿨타임 시간
    [SerializeField] private Image coolDownImage; //쿨타임 이미지 드랍
    [SerializeField] private Slider castingSlider; //슬라이더 드랍

    private Coroutine skillSequenceCoroutine; //현재 실행중인 스킬 코루틴을 저장하는 변수
    //저장하는 이유: null 체크 - 중복 실행 방지(버튼 클릭시 코루틴이 돌텐데, 캐스팅 중에 또 눌리는 것을 방지)
    void Start()
    {
        if(coolDownImage != null) //쿨다운 이미지가 null이 아닐 시
        {
            coolDownImage.fillAmount = 0.0f; //Fill Amount는 0
        }
        if(castingSlider != null) //슬라이더가 null이 아닐 시
        {
            castingSlider.gameObject.SetActive(false); //활성화 false
        }

        /* 유니티의 OnClick 컴포넌트 활용 시 생략 가능. 단, 하단의 OnClickSkillButton이 public이어야 함.
        Button btn = GetComponent<Button>(); //Button 컴포넌트 가져오기
        if(btn!=null) //null이 아닐 시
        {
            //해당 버튼을 클릭했을 때, 어디 메서드를 실행할 수 있도록 등록
            btn.onClick.AddListener(OnClickSkillButton); //스킬 클릭시 OnClickSkillButton 메서드 작동
        }
        */
    }

    //인스펙터의 Button 컴포넌트 메뉴 활성화
    public void OnClickSkillButton()
    {
        if (skillSequenceCoroutine != null) //스킬시퀀스코루틴이 null이 아닐 시
        {
            return; //클릭 불가
        }
        skillSequenceCoroutine = StartCoroutine(SkillSequenceCo()); //실행된 코루틴 참조를 SkillSequenceCo에 저장
    }
    //캐스팅 슬라이더(스킬실행중)
    IEnumerator SkillSequenceCo()
    {
        if (castingTime > 0.0f && castingSlider != null) //캐스팅(1.5)이 0보다 크거나, null이 아닐 시(연결되어 있을 때만)
        {
            //슬라이더 보여주기
            castingSlider.gameObject.SetActive(true); //슬라이더 true 활성화
            castingSlider.value = 0.0f; //값을 0으로
            float castTimer = 0.0f; //타이머
            while(castTimer < castingTime) //타이머가 1.5초보다 작은 동안 반복
            {
                castTimer += Time.deltaTime; //시간당 타이머 더하기
                castingSlider.value = castTimer / castingTime; //진행율 계산(슬라이더 값 = 타이머/1.5)
                yield return null; //중단, 다음 프레임까지 대기
            }
            castingSlider.gameObject.SetActive(false); //while 종료, 슬라이더 off(false)
        }
        //쿨타임 표기
        if(coolTime > 0.0f && coolDownImage != null) //쿨타임이 0보다 크거나, null이 아닐 시
        {
            coolDownImage.fillAmount = 1.0f; //Fill Amount는 1
            float coolTimer = 0.0f; //타이머
            while(coolTimer < coolTime) //타이머가 쿨타임보다 작은 동안 반복
            {
                coolTimer += Time.deltaTime; //시간당 타이머 더하기
                coolDownImage.fillAmount = 1.0f - (coolTimer / coolTime); //(진행율 계산(Fill Amount = 1-타이머/1)
                yield return null; //중단, 다음 프레임까지 대기
            }
            coolDownImage.fillAmount = 0.0f; //while 종료, FillAmount는 0
        }
        skillSequenceCoroutine = null; //스킬시퀀스코루틴은 null (클릭 가능)
    }
    private void OnDisable() //비활성화시 호출. UI 닫기, 씬 전환, 오브젝트 비활성화 시 사용
    {
        if(skillSequenceCoroutine != null) //스킬시퀀스코루틴이 null이 아닐 시
        {
            StopCoroutine(skillSequenceCoroutine); //스킬시퀀스코루틴 중단
            skillSequenceCoroutine = null; // 스킬시퀀스코루틴은 null
        }
        if (coolDownImage != null) //쿨타임이 null이 아닐 시
        {
            coolDownImage.fillAmount = 0.0f; // 0으로
        }
        if(castingSlider != null) //슬라이더가 null이 아닐 시
        {
            castingSlider.gameObject.SetActive(false); //비활성화
        }
    }
}
5. 코드 추가
- Cool Down Image에 자식 이미지 CoolDown 추가
- Casting Slider에 CastingSlider 추가
5-1. Button btn을 사용하지 않았을 경우
+ 후, On Click()에 UI 이미지 추가, SkillController의 OnClickSkillButton 선택


'개발일지 > Unity' 카테고리의 다른 글
| [Unity] 애니메이션 (작성중) (0) | 2026.06.02 |
|---|---|
| [Unity]Ray복습, UI, OverLap, Check (0) | 2026.05.27 |
| [Unity] Prefabs, RayCast (0) | 2026.05.26 |
| [Unity]Rigidbody, Collider (0) | 2026.05.26 |
| [Unity]이동, 회전 (0) | 2026.05.26 |